Sunday, 11 May 2014

Adventure Time: Making the Peppermint Butler

Some of you may not be familiar with the cartoon and comic sensation that is Adventure Time. Congratulations, you almost certainly have a life and no children. Set in the post-apocalyptic land of Ooo, Finn and Jake troll around having adventures and generally being awesome. By far my favourite of the princesses they regularly hang out with is Princess Bubblegum, for the following reasons:

  1. She rules the Candy Kingdom without a regent, or a prince, or anyone else telling her what to do (she also created the Candy Kingdom and its people)
  2. She is a scientist and inventor, who is drawn to smart people who relate to her as an intelligent woman
  3. She is as often rescuer as rescued
(I should say at this point that I'm really only familiar with vol.1 of the comics and series 1 of the show, my knowledge is probably out of date for the hardcore fans out there.)

So, like the Princess herself, I set out to create myself a Peppermint Butler.


Materials:
White foamboard (5mm thick, A3)
Daler Rowney Canford Card in 007 (Bright Red) and 049 (Navy Blue)

From the craft kit:
A large plate
A craft knife
PVA glue
White paper
Black marker
Responsible adult (or equivalent if this is not available where you live)

I started by drawing around the plate on the foamboard. I folded the navy card in half and used the bottom 1/3 of the plate against the pre-cut edge to create his tux. I then added the tails, without rubbing out the shape of the plate. I cut both pieces out, then cut the tails off the one with pencil marks, along the curved line. I also drew the outline of the plate on the red card and marked where the tux would sit.

Using a responsible adult (My Girl), I cut the foam board with a craft knife, and then tidied the edges with scissors. I positioned the two tuxedo pieces against one edge and glued down

I drew the markings freehand onto the red cardboard, in the right positions on the circle I drew earlier, and cut out two of each. I placed them onto the foamboard based, and glued into place.

I drew the arms, legs, hands and feet freehand on card and cut them out (again, two of each piece), and one bow tie. I glued these together and placed them onto the body. The cuffs I made from plain white paper and wrapped around the wrist. I added the black lines in marker pen, and drew on his face.

That's it, a Peppermint Butler to call your own.


Saturday, 3 May 2014

Free Comic Book (Craft) Day

The first Saturday in May is Free Comic Book Day. I made sure to go out and celebrate with my fellow Bucks-based-nerds at Dead Universe Comics in Friar's Square (Facebook), then I came home and started planning for my fiancée's epic Heroes and Villains barbecue birthday party.

I'm something of a magpie for craft materials; I buy things when I see them and find a use for them later! Rummaging in my craft box, I came across some coloured twine I bought from The Works, and two 1.5m samples of Marvel wallpaper from B&Q. The project that presented itself was obvious: bunting.

The height of the flag is also 105mm
I started with working out how widely-spaced the holes on my hole-punch are. Then - aiming for five flags on each width - I settled on 105mm width and height, and laid it out. I didn't refer to where the design is in relation to the flags, because it would have been too much of a headache, and I wanted to reduce wastage. If you wanted to, you could obviously draw the triangles out on the front to get the ideal images.


I cut all the flags out, and punched holes in the top, then strung them along the twine and secured with tape on the back. My bunting is one-sided; to make it double-sided, cut the same number of flags again but don't put holes in. Then glue the un-punched triangles onto the back. The length of twine on the reel wasn't labeled, but I think I had 4.5-5m. With about 20cm left at each end and 6-7cm between flags I had 30 flags on my bunting. It's not an exact science, of course, I decided not to be over-accurate.

I think it took me an hour (about half of my Bob-Hoskins-tribute viewing of Who Framed Roger Rabbit?) and looks better than I expected. Hurrah!


A footnote: The cross stitch in the picture is this kit, which we bought from Hobbycraft. It was The Girl's first embroidery but she's very good at the detail and - unlike me - always gets projects finished.

Saturday, 26 April 2014

Grandpa's Gardening

"Grandpa's Gardening" is a term my mum coined to describe sitting (or sleeping) in the garden and calling it gardening. I had an excellent time "gardening" today, whilst Emily along with the lovely Peta Evans of Living Image Gardens, transformed our garden.

Before: patio
Peta repositioned the patio stones
over sand and plum slate
Our garden is long and narrow, and mostly in shade. The patio end is never in direct sunlight. Peta helped Emily to choose alpines and other plans that would thrive without much light. The plan was to create a rockery on the right of this image, and a barbecue space on the left. We don't own the house, so couldn't go for a full garden redesign, but these changes have turned what we have from just a neat garden a really special place to be.

The materials and plants came from B&Q. The slate is "plum slate" in two sizes (small and large), laid over sharp sand to form the barbecue pit (the sand was also added to our chalky soil to help out the alpines). The barbecue is Longley by Blooma.
The completed barbecue pit
To create the rockery, Peta used timber to frame the bed, and filled it with a mix of the soil that was taken away from the barbecue pit, compost, and sand. Three larger stones created a space for a raised bed at the back. There were some large cobbles in the garden that they used to add interest around the plants.

The rockery is framed and raised with timber beams; large stones add another level
The final touches were three lamps for citronella candles (Blooma at B&Q) and the gorgeous reconditioned, cast iron bench Emily found at the South Bucks Hospice shop at Aston Clinton. We also have some lovely solar dragonfly lamps and post lamps to bring some colour to the garden at night.

I am really looking forward to summer in our gorgeous garden. One of the things I really love is sitting in the garden and working or reading outside with the cat. When I had the choice as a child I would always work outside. I haven't done any gardening myself for over ten years, but the sight and smell of summer flowers relaxes me. When I am having difficulties with my mental health, I find that sunshine is good for me, but hard to force myself into. Having a lovely setting, and somewhere to sit, makes even the worst of days that little bit brighter. 

The completed rockery and reconditioned bench


Monday, 10 March 2014

Chilterns Ripple Rug

I have been fascinated with t-shirt yarn for some time, and bought some back in January with a view to making a blanket for the cat. It proved trickier than I had expected, and the cat had selected her bed before I got anywhere, but I am working towards finishing a long treatment at the moment and was thinking about a thank you present for the community that has supported me through it. I wanted to make something for one of the treatment rooms, and settled on a rug.

We are surrounded here in Bucks by the Chilterns Area of Outstanding Natural Beauty (at least, so long as it's not driven through by a high-speed train, but that's another story). I was drawn to the idea of a ripple blanket - like the peaks of the hills - made in t-shirt yarn to be about 1.5m in diameter, and chose to use the 12-point Rainbow Ripple Blanket (Ravelry). I spent a bit of time in my stash and at Hobbycraft selecting just the right colours of Boodles to represent the Chilterns; grey for flint, two greens for the woodland and fields, two blues for the sky and water, and a white chalk border.

The Chilterns ripple rug: flint, water, fields, sky, woodland and chalk
Pattern, Rainbow Ripple Baby Blanket (c) Celeste Young
The process of making a gift is always tied up in enjoyment and worry for me. I always worry about the recipient, and how they will react. In this project, I've also found the time I spent working was a good time to reflect on what this period of treatment has meant for me, and how I'm going to move on. Ending with a craft project gave me time to think that I might otherwise have not made space for.

I found it really easy to work up, and used a 12mm hook to make it slightly looser in texture. The nature of Boodles is that some skeins are very thick whilst others are very thin, and the thick yarn was far too thick for the 9mm hook they recommend. My only real problem has been blocking it; it takes blocking pretty well in the short term but will quickly shrink back. I'm not sure how well it will actually work as a rug but hope that when it's in situ it will wear in. I am still considering stitching it to a backing to hold the shape, but I like the effect of being able to see the floor through the holes.

If I were to make it again, I would probably choose an even bigger crochet hook, to try and avoid it folding in on itself. 

Tuesday, 18 February 2014

Quick and easy: Shoelaces

I recently, finally, retired my Games Maker trainers. Although I was selected as a Games Maker in the Venue Protocol Team (Copper Box) for both the Olympics and Paralympics in London 2012, I broke my leg on the 30th June, and didn't make it to the games (it was early September before I was anything like fully mobile again, but because I was immediately post-op the Paralympics remained off-limits). Nonetheless, I've worn the trainers for years. They were the only shoes comfortable when my leg was healing, and I love wearing them, but to avoid wearing them out I've decided to retire them.

I couldn't find any I really loved to replace them. The Vans/Liberty collection are lovely but a bit fussier than I like for everyday. In the end I opted for a really cheap-and-cheerful pair of boys' trainers from Tesco (£4 on sale after Christmas). I wasted a lot of time looking for fun, silly or decorative shoe laces but they all seemed expensive and not quite right.

Finished laces
The Now That's Pretty shoelace tutorial was an epiphany! I dug around in my craft box (I'm really trying not to buy materials if I don't need to) and found 2.1m of gold satin ribbon, 20mm wide. Gold isn't a colour I usually use, but I wanted a quick craft fix and our lovely local Haberdasher is sadly not open 24 hours, so I cut it into 2 lengths, sealed the ends with a gas lighter, and followed the instructions on Ally's blog. My gold glittery nail polish (bought to make green-and-gold nails for Aylesbury Concert Band gigs) sealed the tops.

trainers
Before and after:
F&F trainers
After seeing them on the trainers, it all looked a bit incongruous. I had just bought a lovely pair of 'vintage' (nineties?) Marks and Spencer boots from my local Cancer Research UK shop, and I tried the laces in them. They are perfect together.

If I were to go ahead and make these again, there are a few alterations I would make to my version:

  • I would ruche the top of the laces tighter.
  • I would use clear sellotape instead of Scotch Tape, to make a slightly sharper finish.
It took about 45 minutes to do both (I'm quite slow, you could probably do it faster!) and I will definitely make more ribbon laces, it's a great way to add some glam to a boring pair of shoes. They feel just a bit more 'me'.

Perfect

Tuesday, 31 December 2013

Pay-It-Forward 2013

In January this year, one status dominated my Facebook news feed:
2013 Pay-it-forward
The first five people to comment on this status will receive from me, sometime in the next year, something handmade. There will be no warning and it will happen whenever the mood strikes. The catch? Those five people must make the same offer in their FB status. Go. Create.
I can't resist pay-it-forward, and part of the fun of the challenge for me is in making something for people I don't know well or see often. My girlfriend is driven mad by the time I spend checking things out with her, trying to scope ideas, but I always know the answer when I find it!

I only managed to get photos of four of my five projects this year, but here they are, in no particular order:

Totoro

Pattern by Lucy Ravenscar, related blog post here.
Totoro, pattern (c) Lucy Ravenscar
 This little chap was a gift for my friend Franki, who is epic and adores the film. He keeps watch over her patch in Yorkshire; it's a long way from the forests of Japan but a loyal Totoro does what he must.

Fashionably pastel headband

Pattern from knitty.com, winter 2006.
Calorimetry, pattern (c) Kathryn Schoendorf
My cousin Milly has an epic fashion blog - Fashion Launderette - and awesome pastel-coloured hair (lilac in this pic, but it changes). She loves anything that looks like 'unicorn puke' and this yarn from Ramshambles in York fit the bill perfectly. What I love about this pattern is how easy it makes it to have great hair in winter, without worrying about what a hat might do to it.

Crazy Cat Lady

Pattern from AManicMonday's etsy store.
pattern (c) AManicMonday
A present for Diana, and Tino the Cat. The biggest difficulty with this instant-gratification project was finding the right frame. Cargo came through for me in the end, and I'm really chuffed with how it looks.

Pink mitts 

Pattern from knitty.com, summer 2006.
Fetching, pattern (c) Cheryl Niamath
These are for a school friend who is living in the north of Scotland with a young baby. I love fingerless mitts, and thought they would be perfect for springtime walks with a pram. They are made from a very soft, warm pink yarn (which I remember being a DK-weight merino bought from I Knit London) that I had been waiting for the perfect project to use.

Fluffy grey scarf

I don't have pic of this, but it was a really easy crochet; it took me about an hour and a half using a single hank of fur-trimmed ruffle scarf yarn and a 6mm crochet hook. The scarf was about 1.5m long and really, really warm. Annoyingly in my haste to post it, I forgot to take a photo or make a note of the details from the ball band! I think the yarn was by SMC.


Friday, 27 December 2013

Have Yourself a Nerdy Crafty Christmas

Finally, I can show you the fun things I've been working on lately!

I obviously don't want to blog about my girlfriend's presents, but I was really keen to share with you her two dice bags.

Zombie Eyeball
This disembodied eyeball is functional and good-looking. With all the vitreous gel wrung out of it, it perfectly holds Zombie Dice with room to really get your hand in and have a rummage. Even better, it can be tied off with the use of the handy, loose blood vessels.

Cthulhu
For many cultists, bas-relief clay just isn't enough any more. To really drive them crazy, this craven image in wool can also be used to store everything you need to drive your rivals mad.


Thursday, 28 November 2013

Who's afraid of the mental patient?

Mental health stigma seems to peak around Hallowe'en season. We all heard about the outcry over major supermarket 'mental' costumes back in September.

I know I'm a little late to the Hallowe'en party but I was in Hobbycraft the other day (other craft shops are available, etc.) browsing through the books. Whilst browsing, I found Super Scary Crochet, which I had seen and liked before so I started to flick through. Lots of the patterns are really fun, I liked "Mummy" (and really liked that her description of a mummy, whilst brief, aims at accuracy - nerd alert!). Unfortunately, in the middle of a lot of really fun amigurumi patterns is "Murderous Mental Mary".

Murderous Mental Mary
"Mary is a serial murderer who lives in an institution ...
She has murdered lots of nurses and ... doctors"
Pattern (c) Nicki Trench, www.nickitrench.com
According to the pattern description, "Mary is a serial murderer who lives in an institution, but occasionally escapes. She has murdered lots of nurses and has a blood lust for doctors. Each time she kills, she dribbles blood with excitement" (see left, below).

Mary's inclusion in this book plays into the same fears that the "mental patient" and "psycho ward" costumes play into. There is no need to play up a character with talk about mental health issues, or "institutions", but the hyperbole of horror is always out to shock, and my guess is that this was the author's intention here. A murderer in a high-security prison? Not scary enough. Let's make her mental, and add some "blood lust" in for that extra frisson of excitment.

Murderous Mental Mary
"Each time she kills, she
dribbles blood with excitement"
Pattern (c) Nicki Trench,
www.nickitrench.com
To be clear, although I think this is all pretty rotten, Nicki Trench didn't invent the idea of the "mental patient" as a figure of horror and disgust any more than did Tesco and Asda. The fear of the "other" and of a loss of control are well-documented areas of the human psyche. We fear that we know we could become, the things that hold up a mirror to what we perceive as the worst of ourselves. A murderer is horrifying, but a murderer who is out of control and "mental" is almost irresistible to our own internal lust for horror and fantasy. This always has been the case, one only needs look at the ways in which Bedlam hospital was opened to the public for their gawping in the C18th to see the noble history of how we relate to mental illness. 'Bedlam' is also currently the name of a popular C4 documentary about a mental health trust in South London; the very name has become synonymous will illness and spectacle. (For a good overview of the history of Bedlam, I would recommend Catharine Arnold's excellent study, Bedlam: London and its mad.)

Don't misunderstand my intentions here, I'm not going to start calling for people to stop stocking Ms. Trench's books, or start a letter-writing campaign. Nicki Trench is a talented designer, and I'd always urge you to support creatives - they need to eat, too. 'Mary' is but a symbol of how widespread in our culture the fear of "madness" is. 

I also want to address the accusation that people who are worried about the association between horror and depictions of mental illness have lost our sense of humour. I am always aware of the risk of "going on about stigma or overblowing it. It might seem petty in the grand scheme of things, but I see people day in, day out, who are terrified of disclosing mental health issues to anyone (even a professional) in case they lose their job, lose their friends, are labelled a "freak". That fear hasn't just popped into their heads from nowhere, the stigma is real and damaging. It leads people to avoid seeking help, and in extreme cases not seeking help can lead to death.

If you want to do something to help, take a look at Time to Change. You could even sign up to their pledge and make my day. 

To end on a lighter note, here's a video made by the charity Bring Change 2 Mind:

Saturday, 16 November 2013

Hooked on crochet


I've been a knitter for my adult craft-life. I define myself as such and seek out likeminded yarnies (what can I say? - tribalism suits me). I have attempted to crochet before, but never got far beyond basics and got bored.

Recently my yarnie-side has been horrified to discover that not only is crochet easier than I thought, it's actually really fun. I needed a project to take on a plane with me, and my hit-rate at getting knitting onto airlines is pretty hit-and-miss at the best of times. I was flying into the US and generally didn't like the idea of trying to explain to the TSA that they didn't need to confiscate my hard work and lovely needles, because Denise interchangeable needles are certified airline safe. So, grudgingly, I thought I'd give crochet one last chance.

One conference and two sets of bunting later ("My First Bunting" and "Big Gay Bunting"), it turns out I really love the instant-gratification feel of small crochet projects. They seem to work up faster than their knitted equivalents and use less yarn.

Grey Totoro Amigurumi
pattern (c) Lucy Ravenscar
Naturally, I progressed to amigurumi, which has been the one craft area where I have never felt knitting really cuts it. My Neighbour Totoro worked up with a lovely, dense fabric, really easy to stuff.

In my charity knitting endeavours, I have been teaching people to do yarncrafts as part of a social group. The vast majority find crochet much easier than knitting. We've made Attic24's striped wristwarmers and Crochet in Color's mitts to get people used to various stitches and the difference between working in the round and on the flat, as well as teaching about gauge and making the existing pattern man-hand-sized. Not bad for the first month at a new craft!

gloves
pattern (c) Crochet in Color
The joy of having both crafts in my arsenal of yarny goodness is that I can pick and choose. Some projects just look better in one than the other. Amigurumi is a great technique for a sturdy cuddly toy, but I prefer the knit look for clothes. If I've learned one thing from my great crochet binge, it's that flexibility is a good thing. Binarism is so passé, let's transgress some yarncraft boundaries!

Friday, 16 August 2013

Blogging about Craft and Mental Health

I've long talked about the link between craft and wellbeing. It's not a simple link. Sometimes on a bad day I get really crafty. As I write this, in August 2013, I've just learned to crochet (for about the third time!) and I've made bunting, an amigurumi, some letters for an appliqué project and I'm working on some plarn. Sometimes a bad time is the last time I'm going to want a project. If I do, I tend to want something new. The Works in Progress Box is a law unto itself.

When I learn a new knitting technique or find an absorbing new project, it's addictive and fun. I become absorbed and for that time the intrusive thoughts can't find a way in. The craft is all. It helps if I have some radio, telly, or a book to concentrate on as well but it seems to take up the bit of my brain that the intrusive thoughts seep into when they're left empty.

I have explored the connection in blog posts before, and I have posted a fair bit from the archives - so although this is my first post here, you'll find some posts that were written in the past three years. Look around, enjoy, comment.

I'm also on Twitter and Pinterest, I'm rowleypolybird on both.


Monday, 13 May 2013

Om Nom Hat

My girlfriend is a gamer and a nerd. She loves interesting knitted hats, and when she saw an Om Nom hat for sale on Etsy, she wanted one immediately.

I don't crochet, so I set out to recreate one in knitting.

This is a pattern based on Hannah by Blake Ehrenreich, but you could use any hat pattern, as long as it is worked from brim to crown, and you start the antenna with 8 stitches.

The reason for choosing Hannah as the base was two-fold. Firstly, I made a lovely, pink Hannah from Manos del Uruguay a few years ago and the Girl envies it! Secondly, because of the deep brim and the purl ridge that marks the beginning of the crown, I knew it would be very easy to place Om Nom's teeth. I didn't want them hanging over the edge of the hat.

Om Nom
When I made Hannah in the past, the back opening around the pony tail curled inwards, so I worked 2 stitches on each end in garter stitch to prevent that.

Garter stitch around the pony tail
opening prevents curling
Click here to see my project on Ravelry.

Yarn: A worsted or aran in Om Nom green (15 stitches and 20 rows = 4 inches in stockinette stitch on 6mm needles). When I finally found the right colour, it didn't come in worsted or aran, so I used Hayfield Baby DK 'In the Limelight' held double, and it turned out well. It's very soft.

Notions: White felt, black marker, a small amount of toy stuffing.

Antenna pattern:
starting on the final round of Hannah as written (or working the last round of decreases on your hat pattern of choice):

Rnd 40: (K2tog) 6 times—8 sts.
Rnd 41 - 48: knit around

Divide sts so that the four at the front of the hat are on one needle, and hold the back four on a separate needle. You will work the four front stitches flat for the next few rows.

Row 1: slip 1, p to end
Row 2: slip 1, k to end

Work these two rows until you’ve worked 5 rows (i.e. ending on row 1).

Knit across these 4 sts*. Using a new needle, pick up 5 sts from the slipped sts on the end of the rows, and knit 2 of the held sts. Using a third needle, knit 2 of the held sts and pick up 5 along the other slipped edge.

*If it matters to the pattern - e.g. if you're making Hannah, these should be at the front of the hat

You should now have 18 stitches on three needles.
Work around these 18 stitches for about 2cm.

At this point, stuff the top of the antenna firmly.

Next round: knit 2 together around (9 sts)
Next round: knit 1, knit 2 together around (6 sts)

To finish: cut the yarn leaving a tail. Thread the end of the tail onto a sewing needle and pull the yarn through the last 6 sts.

The face
I used white felt and black marker pen.
  1. Draw around a jam-jar twice on the back of the white felt (with a pencil!) to create two overlapping circles.
  2. Trace these circles with a black marker to the point where they bisect so that you have a goggle shape. Add pupils.
  3. Make 4 triangles of white felt with a black outline for the teeth and place them along the purl ridge above the ribs.
  4. Sew the features in place and wear with pride.

Monday, 24 September 2012

Learning to Draw

One of my friends challenged a group of us on a social networking site to draw from this online tutorial. I am no great artist, but I thought I'd give it a go, and I'm quite pleased with how it turned out! I think I might even put it on the fridge.


I was surprised by how relaxing it was. I have always associated drawing with stress - I've never felt I'm very good at it, and one art teacher in particular used to very publicly despair of me - but just working methodically on a drawing from a tutorial was quite chilled out and very absorbing. A bit like following a tricky knitting pattern. 

Saturday, 7 July 2012

Nodavus!

(That's what a knitting spell would look like if I wrote Harry Potter.)

Of course, even Molly Weasley doesn't have a knitting spell. That would take all the fun and the little imperfections out of handmade goodies.

I've been crap at finishing Kirsty's Weasley Sweater but there's nothing like a broken leg to get the knitting juices going. So here's the finished object!


I charted the K myself, you're welcome to use it for your own Weasley Sweater or K-project.
chart for the letter K
A note on the intarsia: I started off knitting 3 and then wrapping the yarn each time, but because the leg of the K is long and straight that meant that the wraps started to pull on the front and were visible. So I started wrapping at any point between two and five stitches of the contrasting colour and it sat much better.

I've also finished another sweater for Joshua, this time in Opal sock yarn. It was lovely to work with, but took a little longer than I expected. He hasn't quite grown out of it yet, thankfully.

Joshua
This is his "no, really, I love it" face.

Originally posted on RowleyPolyBird

Wednesday, 4 April 2012

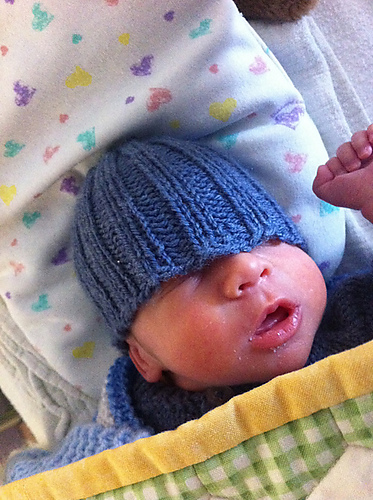
Preemie Beanie (pattern)

This is one of my mum's patterns: Theatreknit on Ravelry. The PDF is available to download here

Joshua models his funky new hat in SCBU (NICU)
at 32 weeks (3lb 12oz)

"My first grandson was born 10 weeks early and, like most preemies, had difficulty keeping warm. This hat grew with him from birth at 30 weeks (3lb 6oz), and so is suitable for a preemie or
a small newborn. When they’re really tiny, the brim folds up neatly to fit."

Knit kit
3.75mm (US 5) DPNs
Sirdar Click DK with wool, 1 skein (50g, 150m)

NB: I skein will easily make 2 hats;
you can use any washable, soft DK wool

Instructions
Cast on 64, join in round and divide evenly between DPNs.
Work in k2 p2 rib for 4 inches.

Decreases:
Rnd 1: *k2 p2 k2 p2tog* to end (56 sts)
Rnd 2: *k2 p2 k2 p1* to end
Rnd 3: *k2 p2tog k2 p1* to end (48 sts)
Rnd 4: k2 p1 k2 p1 rep to end
Rnd 5: k2 p1 k2tog p1 rep to end 40 sts
Rnd 6: k2 p1 k1 p1 rep to end
Rnd 7: k2 k2tog p1 rep to end 32 sts
Rnd 8: k2 p2 to end
Rnd 9: k2 p2tog to end 24 sts
Rnd 10:k2tog p1. To end 16sts
Rnd 11: k2tog rep to end 8 sts
Rnd 12: k2tog rep to end 4 sts

To finish:
Break yarn and pull through remaining sts.

When knitting for a baby in hospital, always wash the garment,
then (using clean hands!) 
transfer it to a ziplock bag for delivery. 
download now

Originally posted on RowleyPolyBird

Wednesday, 22 February 2012

I will knit and wear a Scarf of Doom with pride

I have had a problems with my mental health over the years, as most people who know me will know, but many things help to keep me ticking over when it's pretty crappy. Knitting is definitely one of them. The satisfaction of producing something handmade is always brilliant, even when it's as simple as a scarf that will take 3 hours. And, moreover, there are always other knitters to talk to, encourage, be supported by, and learn from. Not to mention all those potential knitters to bring to the dark side!

Deadly Knitshade is the sort of knitter all knitters want to be. She's a fab designer, a brilliant and clever writer, and she scrapes a living doing what we all love. Proper kudos! She also learned to knit - like so many others - when life was a bit shit. She appeared on BBC London news a few weeks ago (alongside the perfectly marvelous Aneeta Patel of Knitting SOS), and managed to do an early morning interview, whilst knitting a garter-stitch scarf. Quite an achievement! Both Lauren and Aneeta are fabulous ambassadors for the knitting community, and the range of knitted items they had between them to show off would be enough, I hope, to convince the world that these talented ladies have something pretty special going on.

However, not everyone was as entranced by this performance as they might have been and the haters came out in force. Hiding behind the internet, ordinary people (even some knitters) started bitching about the scarf and using it as a means to cast aspersions on Lauren herself; even on the lovely blue hair! (I also have blue hair at the moment, blue hair is cool.) Very sadly, the staff of some well-known yarn companies joined in on their Facebook pages. As Ms. Knitshade has failed to name and shame them in her blog, I will follow suit, but I will also think twice before I shop with them again.

And so to the Scarf of Doom. It has become a symbol for all that is best about the knitting community. We make stuff that looks however the [cough] we like. If we want to make a fugly scarf, and if we (or anyone else) is proud to wear it, then we damn well will and all the internet hate in the world won't stop us.

I have raided my stash and found some left-overs that will look brilliantly bold and probably clash quite a lot. My Scarf of Doom will stand for all I love about knitting; it will make me happy!

Woolly solidarity!

Aneeta's books: Knitty Gritty, and Knitty Gritty: The Tricky Bits
Deadly Knitshade's books: Stitch London, and Knit the City
Ravelry users' Scarves of Doom

Originally posted on RowleyPolyBird

Sunday, 1 January 2012

Knitting Resolutions 2012

1. Finish everything I have on the needles: Kirsty's Weasley Sweatermy Over the Rainbow shawlmy Geek cardimy summer cardi. I find it hard to keep working on things for myself, when there's so much pretty to make for other people!

2. Knit some overdue presents: something pretty for the Wife to replace the Mangyle she never wears (and donated to C4WS), a green tea cosy for a friend at Seminary, and one for Mum and Dad to match their new kitchen, a Bloody Stupid Johnson for Peta.

3. Other presents: A Mangyle for Dr. Mark, because he was admiring the Wife's but wants one in blue, lots of little things for Baby Peanut.

4. For me! A Noro skirt from Stitch and Bitch superstar, and the Defarge Stole from What Would Madam Defarge Knit.

Originally posted on RowleyPolyBird

Tuesday, 29 November 2011

Theatreknit's Warm Winter Socks

This pattern was donated as part of my campaign to get people knitting for a London homeless shelter. Thanks to Ravelry's Theatreknit. I have added links to knittinghelp.com in places where you might need extra intstructions. 

Yarn: DK weight (sample knitted with Patons DK with wool)
Needles: 3.25mm

Loosely cast on 48sts. Divide over 3 double-pointed needles and join being careful not to twist the sts.
Work in K3 P1 rib for 7 inches (or preferred length)

Heel Flap:
Knit 24sts turn
Row 1: Sl1 purl to end
Row 2: Sl1 K1 repeat to end
Repeat rows 1 & 2 14 more times.

Shape Heel:
Row 1: K 14 sts, ssk, k1, turn.
Row 2: Sl 1, p5, p2tog, p1, turn.
Row 3: Sl1, k to one stitch before turning gap, ssk, k1, turn.
Row 4: Sl1, p to one stitch before turning gap, p2tog, p1, turn.
Repeat Rows 3 and 4 until all sts have been used
End on WS row with either p2 tog or p2 tog, p1.
14 sts on needle

Gusset:
1. Pick up 15 stitches knitwise down side 1 of the heel flap. Place a marker.
2. Rib across the 24 stitches from the cuff.
3. Place a marker, then pick up 15 stitches knitwise up side 2 of the heel flap.
You should have 68 stitches.

Now continue with the following 2 rounds, until 48 stitches remain:
1. Knit up to 3 stitches away from the first marker, then Knit 2 together, then Knit 1.
Slip the first marker, then Knit across until you reach the next marker.
Slip the second marker, then Knit 1, then S2K2tog, then knit to the end of the round.
2. Knit around.

When you have 48 stitches remaining, continue without decreasing until foot measures at least 8 inches (UK size 6) from back of heel. You can adjust the length at this point. The easiest way to work out a size is to ask a friend to measure their foot! For men, size 8 or 9 is ideal.

Toe
1. (Toe Decrease Round) K1, ssk, k to end of Needle 1; k to last 3 sts of Needle 2, k2tog, k1; k1, ssk,
k to end of Needle 3; k to last 3 sts of Needle 4, k2tog, k1. 4 sts decreased.
2. K around.

Repeat these 2 rounds until 20sts remain
Use Kitchener stitch to graft these stitches.

Originally posted on RowleyPolyBird

Monday, 26 September 2011

Why I'm Running 13.1 Miles

On the 9th October, I'm running the Royal Parks Foundation Half Marathon for young people's charity YouthNet. It's been a really difficult period of training - recently interrupted for weeks at a time by ill health - and I'm working really hard to do this.

In the grand scheme of things, I suppose not many people have heard of YouthNet, the charity that runs TheSite and Do-It, but they have an enormous, unseen impact. I started as a service user on TheSite ten years ago, so I feel like they've seen me through my awkward adolescence and out the other side.

I'm not going to claim to have had a terribly difficult life; I had a rough time with mental health difficulties as a teenager, which manifested in a number of different ways, but generally my family were supportive. I still needed somewhere more private and anonymous to talk and be listened to. A non-judgemental outlet is one of the most helpful things you can give to young people in these circumstances, and that is a huge part of the ethos of TheSite. The fact sheets present information without judgement, and the message board and live chat user communities provide a peer-support system that allows people to be anonymous and therefore more open than they would be among friends and family.

Back in 1996, when the charity was first forming, it was very difficult to find funding. The idea of a charity offering services entirely online seemed somewhat limited in the days of dial-up, and there were concerns about the sort of information children and young people might be able to access (predictably, early on the non-judgemental nature of the information TheSite.org provides has in the past riled the Daily Mail). Now, we can hardly imagine the world without the internet, and it seems obvious to me that young people who find it difficult to access support services turn to the internet for help. Indeed, TheSite.org appears in the top results on Google for issues such as unplanned pregnancy and self-harm. Online support isn't the be-all and end-all for big issues but it can be very helpful in sign-posting people to local services, and persuading them to seek help.

I'm hoping to start training as a chat moderator in the next few weeks, to help facilitate the live chats. These days, a lot of people come to the community through the live chats and it's inspiring to see how uplifting the community can be for people who are in real distress.


Originally posted on RowleyPolyBird

Thursday, 25 August 2011

Only Skin Deep?

Image has been on my mind a lot lately.

If I'm honest, image is on my mind a lot, full stop. If I'm not fretting that my straighteners don't work in humid weather (grrrrr), I'm probably staring agonisingly at my wardrobe / make-up bag, wondering why nothing I own makes me look how I want to.

Actually, I'm even multi-tasking whilst I write this - touching up my roots with my favourite Superdrug blonde - the one that looks like banana-flavour penicillin when you mix it.

I was watching the lovely Ms. Cherry Healey on BBC3 the other day; Cherry's Body Dilemmas (and doesn't she look good in a corset?). I was fascinated by it. I don't suppose this is the place to go into my own particular quirks and insecurities, but I'm a mess of them. For all that the UK media is obsessed with our bodies and how we use and see them, it's actually quite unusual to see this level of frankness and diversity on mainstream telly.

The way we talk about our bodies is warped. It's all extremes and almost never rational. From the HateMail's Liz Jones and her anorexic obsessions to the constant railing against celebrities' wobbly bits and how fatties are eating the NHS out of house and home. The sad truth is that we just can't bear the sight of ourselves.

But what is most refreshing is to see someone who is thin, successful, beautiful, etc., facing up to her own self-consciousness with others without judgement. I admit it challenged my assumption that gorgeous people both know how they look and judge others harshly. I was particularly inspired by the beautiful, and stunningly dressed, Kirsty Lou and her blog. Whilst I cower in high street changing rooms sobbing over size labels, she makes her own clothes and refuses be conformed into someone else's body.

I was struck by her admission that she's suffered because of how she looks. It resonated with me. I've had people cross the street in London to tell me I should diet; they've taunted me from cars in Oxford at 7am and in the back streets of Edinburgh late at night. Friends have called me fat in public and looked astonished when I was upset by it. I even find myself justifying my weight to doctors who don't believe I exercise. I desperately want to take my feminista deconstruction kit to conformist body-shape standards but the truth is that all this just really bloody well hurts and it's too personal to try.

But in the mean time, brava Cherry, Kirsty et. al. for honesty without sentimentality or falsehoods. If telly makes a difference, this is what it looks like. And an honourable mention to Hadley Freeman of the Guardian for this piece which I heartily "hear, hear"-ed earlier this month.

It happens that today is also the fourth anniversary of the death of Sophie Lancaster, a young woman who was killed for her looks. I remember being devastated by the story when I first heard it, as I am by any form of hate crime. The senselessness of the loss of life - not just hers, but also the life her boyfriend and family had known with her in it. S.O.P.H.I.E. (Stamp Out Prejudice, Hatred and Intolerance Everywhere), the foundation her mother founded, is doing great things to teach children that image isn't everything. I wanted to share the video they released today, as further food for thought. We all judge people harshly for how they look; this is a stark reminder of what that culture of judgement does to the world we live in.


Originally posted on RowleyPolyBird

Tuesday, 16 November 2010

The Safest of All Occupations

I was browsing the wonderful xkcd on 'random' today and I came across this:


I thought I'd double check and, as expected, the number of results for blogging accidents is now 17,100 but I have done diligent research and can confirm that this is because bloggers love xkcd and can't help referencing it at every opportunity. This is a relief, because I don't think I can be bothered to work out the %age increase represented by 17,098. It's a lot.*

Just to reassure myself further I ran a quick check on "died in a theology accident":
That's a relief!
So this confirms my plan for the rest of the evening:

  1. Finish this blog post,
  2. Continue researching the theology of John's Gospel,
  3. Knit myself a hat,
  4. Sleep

Sleep, I admit, is the most perilous of these tasks but on a quick, informal risk-benefit analysis the chances of me having some kind of Hulk episode tomorrow if I don't sleep are higher than the chances of me dying in my sleep tonight. I'm knocking on wood as I type this, of course, just in case...

*I know it would be easy to do the maths but I'm leaving it to the first smart-arse who decides to comment on this. Because, basically, I don't like maths. 

Originally posted on RowleyPolyBird